I made my first Moroccan Chicken Tagine. It was quite serendipitous. Adam had set up the free Amazon Prime streaming videos to our Blu-Ray. (Thanks for the Christmas present, Mom and Dad Rowley!) I was looking for something to watch. Then I saw America's Test Kitchen. I had never seen an episode before. My sister-in-law Sarah had been telling me about how great it was (a year or so ago). So I gave it a chance. I was looking through the episodes, and the Moroccan one sounded great! I'd love to travel there someday. One of my friends went there recently and he took the BEST photos of all the amazing mosques and architecture and his whole amazing experience. Since I can't go there right now, I could still get a "flavor" of the country by experiencing some of the food. I watched the episode, and then the next day, my delusions of grandeur took over and I tried to cook the dish. I only had the episode (duh, I should have pulled up the recipe on the internet), and it took FOREVER because I had to fast-forward and rewind and make sure I hadn't missed a step or an ingredient. That was definitely NOT the best way to cook the recipe. Adam had come home and I still wasn't done, and I think I was teaching a voice lesson after dinner so I was really stressing and I had to have him dive in and help me with watching the episode and getting everything all cooked and finalized. It came off as a success (thanks Adam for the help!) and was SO DELICIOUS! I highly recommend it.
If you will watch the episode (it's long and they take a lot of tangents talking about the best way to cook couscous, etc.) then you can see it here. You might have to give you e-mail address. That part is a little annoying.
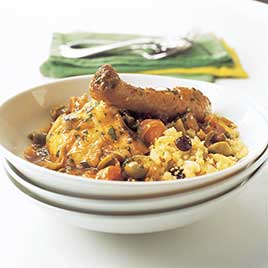
Moroccan Chicken Tagine
This is what you could be eating!
Other things I did differently:
I only had chicken breasts on hand, so that's what I used. I didn't bother with all that breaking down of the chicken, although in the show they give very good instructions on how to do it. Looks like fun and I want to try it sometime. I also didn't add the olives, we're really not that big of fans. I did make the lemon salt garlic paste by scraping it with the flat part of the knife. That part was really interesting and fun. I didn't have a dutch-oven pot, so I just used a big soup pot. Maybe that goes without saying. I don't think I had the fresh cilantro either. It still tasted good without it, but I do love my fresh cilantro!
I also made the couscous pilaf to go along with the chicken, and it is NOT included in the recipe below. It can only be accessed through the part of the website that you have to pay for (boo!) so I was going to watch the show again and transcribe that part and include it. Only I haven't done that yet. Sorry. Also, I didn't have couscous on hand so I used rice and toasted in the pan before cooking. It turned out very well! Good luck and I hope you enjoy! The recipe is a little involved, but I love how unusual it is and I love to challenge myself every now and again. I can go back to easy lazy cooking tomorrow and the rest of the week!
UPDATE: The couscous recipe is added now and can be found at the bottom of the post. Thanks!
Moroccan Chicken with Olives and Lemon (Chicken Tagine)
Serves 4
Bone-in chicken parts can be substituted for the whole chicken. For best results, use four chicken thighs and two chicken breasts, each breast split in half; the dark meat contributes valuable flavor to the broth and should not be omitted. Use a vegetable peeler to remove wide strips of zest from the lemon before juicing it. Make sure to trim any white pith from the zest, as it can impart bitter flavor. If the olives are particularly salty, give them a rinse. Serve with couscous (see related recipe).
INGREDIENTS
1 1/4teaspoons sweet paprika
1/2teaspoon ground cumin
1/4teaspoon cayenne pepper
1/2teaspoon ground ginger
1/4teaspoon ground coriander
1/4teaspoon ground cinnamon
3strips lemon zest (each about 2 inches by 3/4 inch)
3tablespoons fresh lemon juice, from 1 to 2 lemons
5medium cloves garlic, minced or pressed through garlic press (about 5 teaspoons)
1 whole chicken (3 1/2 to 4 pounds), cut into 8 pieces (4 breast pieces, 2 thighs, 2 drumsticks; wings reserved for another use) and trimmed of excess fat
Salt and ground black pepper
1tablespoon olive oil
1 large onion, halved and cut into 1/4-inch slices (about 3 cups)
1 3/4cups low-sodium chicken broth
1tablespoon honey
2 medium carrots, peeled and cut crosswise into 1/2-inch-thick coins, very large pieces cut into half-moons (about 2 cups)
1cup Greek cracked green olives, pitted and halved
2tablespoons chopped fresh cilantro leaves
INSTRUCTIONS
1. Combine spices in small bowl and set aside. Mince 1 strip lemon zest; combine with 1 teaspoon minced garlic and mince together until reduced to fine paste; set aside.
2. Season both sides of chicken pieces liberally with salt and pepper. Heat oil in large heavy--bottomed Dutch oven over medium-high heat until beginning to smoke. Brown chicken pieces skin side down in single layer until deep golden, about 5 minutes; using tongs, turn chicken pieces and brown on second side, about 4 minutes more. Transfer chicken to large plate; when cool enough to handle, peel off skin and discard. Pour off and discard all but 1 tablespoon fat from pot.
3. Add onion and 2 remaining lemon zest strips to pot and cook, stirring occasionally, until onions have browned at edges but still retain shape, 5 to 7 minutes (add 1 tablespoon water if pan gets too dark). Add remaining 4 teaspoons garlic and cook, stirring, until fragrant, about 30 seconds. Add spices and cook, stirring constantly, until darkened and very fragrant, 45 seconds to 1 minute. Stir in broth and honey, scraping bottom of pot with wooden spoon to loosen browned bits. Add thighs and drumsticks, reduce heat to medium, and simmer for 5 minutes.
4. Add carrots and breast pieces (with any accumulated juices) to pot, arranging breast pieces in single layer on top of carrots. Cover, reduce heat to medium-low, and simmer until instant-read thermometer inserted into thickest part of breast registers 160 degrees, 10 to 15 minutes.
5. Transfer chicken to plate or bowl and tent with foil. Add olives to pot; increase heat to medium-high and simmer until liquid has thickened slightly and carrots are tender, 4 to 6 minutes. Return chicken to pot and add garlic-zest mixture, cilantro, and lemon juice; stir to combine and adjust seasoning with salt and pepper. Serve immediately.
TO MAKE AHEAD: The recipe can be prepared through step 4, cooled, and refrigerated for up to 2 days. To serve, gently warm until the chicken is heated through, then proceed with the recipe from step 5.
Authentic Moroccan Couscous
Ingredients:
3 Tbs unsalted butter
3 shallots, sliced thinly (or 1 onion, seriously, who buys shallots?)
2 cups couscous
1 clove of garlic, minced
1 cup water
1 cup chicken broth
1 tsp salt
1/2 tsp grated lemon zest
2 tsp lemon juice
1/4 cup fresh parsley, chopped
3/4 cup toasted almonds, chopped
Add the butter to a sauce pan at medium-high heat until it melts. Add the shallots and cook in butter for 5 minutes until toasted and caramelized. Add the garlic, cook for 30 seconds or until fragrant.
Add couscous, toast to golden for about 5 minutes, but keep your eye on it! It can go from toasted to burned quickly. Then add the water and chicken broth, stir, let sit for 1 minute. Add the salt, stir, and put on the lid and remove couscous from heat. The couscous will continue to cook and absorb the liquid. Let it rest for about 7 minutes. When liquid is absorbed by the couscous, add lemon zest, lemon juice, parsley, and toasted almonds and stir in together in the couscous. Enjoy!